Prerequisites:
- Sitecore (I have used Sitecore 10.3 in this example)
- Visual studio (Visual studio 2019) with Sitecore installed
- .Net 4.8
- Checkout Sitecore compatibility table for Sitecore XP 9.0 and later
Set up a Visual Studio project
To set up a Visual Studio 2019 project for Sitecore MVC:
- Open Visual Studio 2019 as an Administrator and click Create a new project
- In the Create a New Project dialog, add filter C#, Windows ,Web now scroll and Select ASP.NET Web Application and click on Next
- In the Configure your New Project dialog, write the Project name and make sure to select .Net Framework 4.8 then click on Create.
- In the Create a new ASP.NET Web Application dialog, select Empty and check MVC then click on Create.
- Following structure will be created. Delete App_Start folder we will not use it.
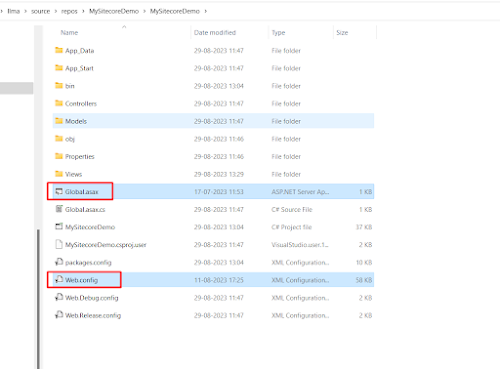
- Copy the Global.asax and Web.config file from the Website folder of the Sitecore installation.
- overwriting the Global.asax and Web.config file that Visual Studio added .
The file should only have this content
<%@Application Language='C#' Inherits="Sitecore.Web.Application" %>
- The Web.config file within the Visual Studio project is basic, whereas the Web.config file in the Sitecore instance holds crucial configurations. This step is to avoid that the file from Visual Studio overwrites the one in Sitecore when you publish.
In Visual Studio, in the Solution Explorer, right-click the Web.config file in the root of the project, and select Properties. Set the Build Action property to None and the Copy to Output Directory property to Do not copy:
- In the NuGet Package Manager in Visual Studio, add these Sitecore packages to your project:
- Sitecore.Kernel
- Sitecore.Mvc
- Sitecore.Mvc.Analytics
Note: Make sure you add Sitecore’s NuGet Feed to Visual Studio: How-To Add Sitecore's NuGet Repository To Visual Studio
- In the Solution Explorer in Visual Studio, set the Copy Local property of each DLL reference the NuGet Package Manager added to False. eg: see below image.
- In the Views/web.config file of your Visual Studio project, add the following Sitecore namespaces to the list of namespaces:
- <add namespace="Sitecore.Mvc" />
- <add namespace="Sitecore.Mvc.Presentation" />
- To ensure quick recovery from any post-publishing issues in the Visual Studio solution, let's create a complete backup of the Sitecore Instance folder located at C:\inetpub\wwwroot.
- Select sc103sc.dev.local folder and right click >> Properties >> Security >> Edit.
- click Add
- Choose "Network Service" and then click "OK."
- Pick "Network Service," mark the checkbox for "Full Control," and then click "Apply."
- click OK.
- Go to the IIS Server and then choose Application Pools right click on sc103sc.dev.local and click on Advanced Settings.
- Modify the Identity dropdown option to "Network Service" and click OK.
- In Visual Studio, choose the project, right-click, and then select "Publish."
- opt for "Folder," then click "Next"
- Browse to choose the Sitecore instance folder. Afterward, click "Finish."
- Click on Show all settings.


Comments
Post a Comment